Groovs Flutter Embed Library
This section focusses on integrating Groov widget using flutter library/framework as a low-code solution
This page is work in progress
What does integrating Groov widgets look like?
Integrating in native mobile applications (using Flutter framework)
The following diagram explains a high level setup and handshake between the interacting components across your app ecosystem and Groov's.
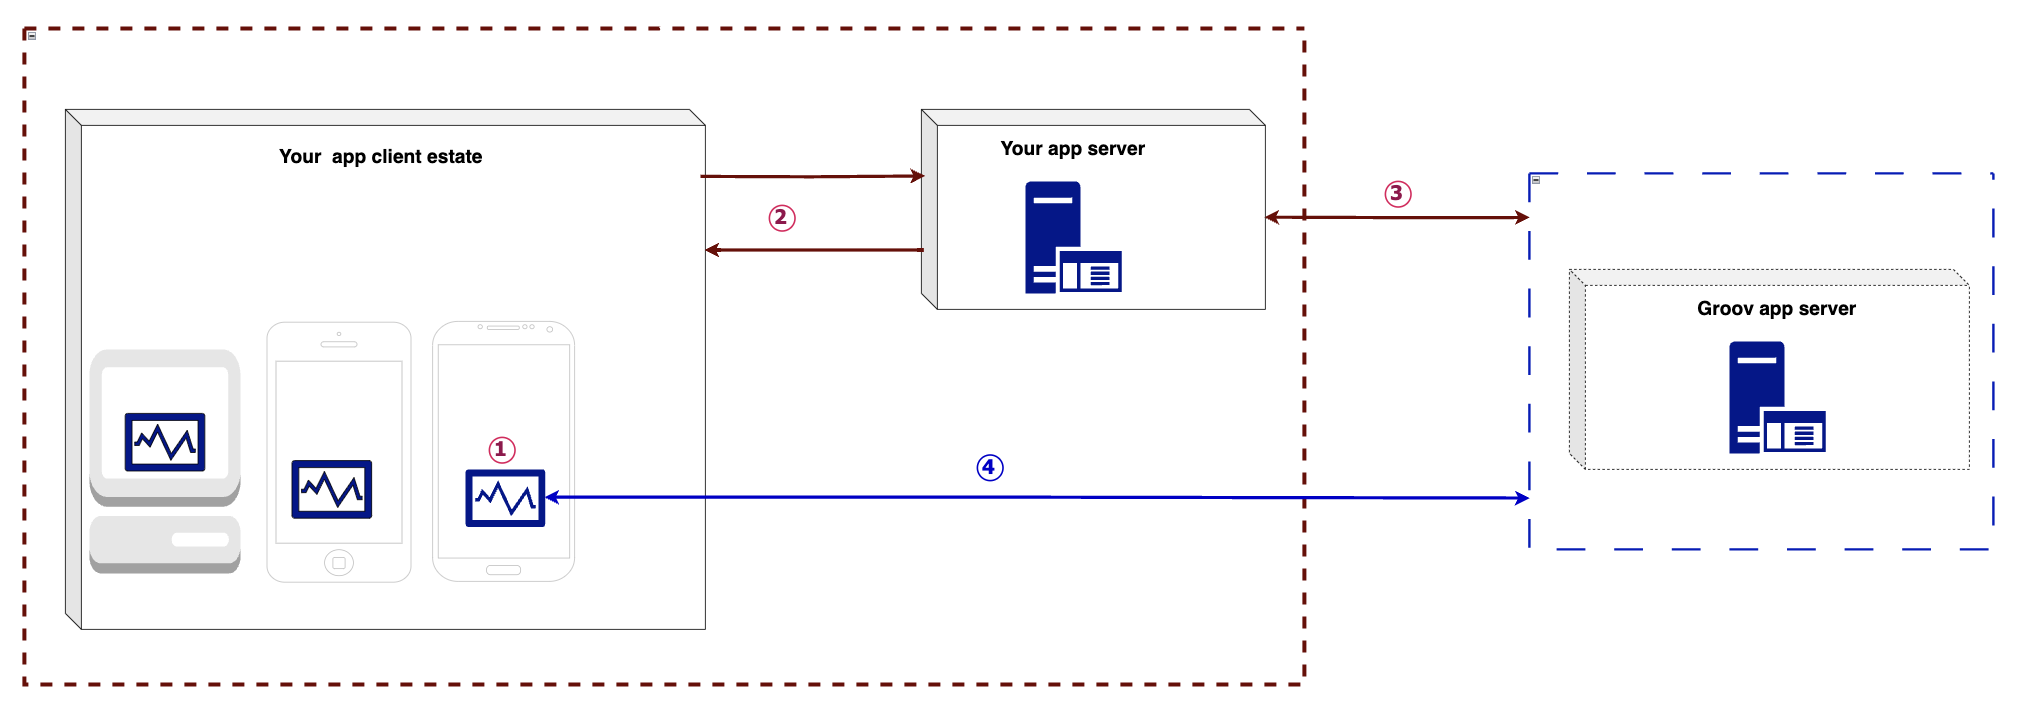
Groov widget setup and interaction pattern
To setup and use Groov widget in a native mobile application (for the purpose of explanation, we have taken an example of an Android app using Flutter framework as your native app client.):
- Add the following WebView framework to your existing client setup
-
Add the WebView Flutter plugin as a dependency if not already added;
cd
<your_flutter_project_dir>;flutter pub add
webview_flutter;load
assetsverify
your_pubspec.yamlfile - Add Groov embed product specific code to your_main.dart file. Refer to the sample code illustrated
- Place the
GroovWidgetRegistrar.jsandGroovMerchantToken.jsin your asset folder
- Place the
- Set
LayOutdetails and callGroovWebViewAppfrom your app.
-
class GroovWebViewApp extends StatefulWidget {
  const GroovWebViewApp({super.key});

  @override
  State<GroovWebViewApp> createState() => _GroovWebViewAppState();
}

class _GroovWebViewAppState extends State<GroovWebViewApp> {
  late final WebViewController controller;
  late String _jsContent;

  @override
  void initState() {
    super.initState();
    _loadJavaScriptFile();

    try {
      controller = WebViewController()
        //set specific parameters
        ..setJavaScriptMode(JavaScriptMode.unrestricted)
        ..setBackgroundColor(Color.fromARGB(0, 0, 0, 0))
        ..setNavigationDelegate(
          NavigationDelegate(
            onProgress: (int progress) {
              // Update loading bar.
            },
          ),
        )
        uuid = Generate();
        // Inject JavaScript into WebView
         await _controller.runJavascript(_jsContent);

        // Call the JavaScript method
       final merChantTokenURL = await _controller.runJavascriptReturningResult(
        "fetchMerchantToken(uuid, authData})"// Pass JWT or your-auth-data-map
          };

        ..loadRequest(Uri.parse(
           merChantTokenURL));
    } on Exception catch (e) {
      print(e);
    }
  }

  Future<void> _loadJavaScriptFile() async {
    // Load JavaScript from the asset file
    _jsContent = await rootBundle.loadString('your-assets/js/GroovWidgetRegistrar.js');
    _jsContent = await rootBundle.loadString('your-assets/js/GroovMerchantToken.js');
   }

  @override
  Widget build(BuildContext context) {
    return Scaffold(
      // set placement details
      body: GroovWebViewWidget(controller: controller),
    );
  }
}
import axios from 'axios';
// Function to relay request to retrieve the Groov merchant token from the first endpoint (POST request) via your app server
export async function generateMerchantTokenByECommerceProvider(uuid, authData) {
// Extract JWT from the authData map
const jwt = authData?.jwt; // Get the JWT from authData
// The updated URL for the first API endpoint
const firstUrl = 'https://your.appdomain.com/api/generateMerchantToken'; // URI for the first endpoint
// Make the POST request to retrieve the merchantToken
await axios.post(firstUrl, { uuid, ...authData }, {
headers: jwt ? { 'Authorization': Bearer ${jwt} } : {} // Conditionally add Authorization header if jwt exists
});
}import { generateMerchantTokenByECommerceProvider } from './GroovWidgetRegistrar.js'; // Import the function that commerce provider implemented
import axios from 'axios'; // Import axios for making HTTP requests
// Function to get the merchantToken from the second endpoint (Groov) with x-api-key header
async function getMerchantTokenFromGroov(url: string, uuid: string): Promise<string | null> {
try {
// Make the GET request to retrieve the merchantToken from the second endpoint with the uuid in the headers
const response = await axios.get(url, {
headers: { 'x-api-key': uuid } // Pass the uuid in the headers as x-api-key
});
// Check if the response contains the merchantToken
if (response.status === 200 && response.data && response.data.merchantToken) {
return response.data.merchantToken; // Return the merchantToken if found
} else {
console.error('Failed to retrieve merchantToken from Groov');
return null;
}
} catch (error) {
console.error('Error fetching merchantToken from Groov:', error);
return null;
}
}
// Updated function that accepts uuid and authData and returns the merchantToken
async function fetchMerchantToken(uuid: string, authData: { [key: string]: any }): Promise<string | null> {
const secondUrl = 'https://app.wearegroov.io/api/v1/getMerchantTokenByUUID';
// First, make the call to geneate the merchantToken from the eCommerce provider, sent the uuid and the authData that they given when they set the webview component
await generateMerchantTokenByECommerceProvider(uuid, authData);
// Then, make the second call to fetch the actual merchantToken from Groov based on uuid
const merchantTokenURL = await getMerchantTokenFromGroov(secondUrl, uuid);
// Return the retrieved merchantToken or null if it wasn't fetched
return merchantTokenURL;
}
- Your app server will need a new web service endpoint implemented to relay
GroovWidgetTokenusing your existing auth mechanism. This step ensures the Groov Widget token (or identifier) acts as a session binder to the logged in user to your app client. You will need the GroovWidgetToken to be passed to Groov in the next step- Your organization is expected to implement a web service to receive and process such requests. This step 2 is purely a communication between your app client and your app server.
- The URL of this web service will need to be specified and updated in
GroovWidgetRegistrar.js
- Your app server will need to make a POST request to Groov endpoint and relay the following:
GroovWidgetToken- this enabkled Groov to bind the widget session to the logged in user/merchantMerchantIdentifier- this will need to be an identifier of the merchant user on your platform. This could be a lead id or userid - something that helps bind a reference of the merchant in your platform to a reference of the merchant on Groov's platform, so that we can always show contextual information to such merchant. Whilst GroovWidgetToken will refresh and change everytime an instance of the widgets regenerates (due to app session timeouts, logouts, etc), the MerchantIdentifier will stay the same for the Merchant- Authorise the call to Groov by sending the x_api_key (the api key) you have for your Groov organisation account. Refer x_api_keys for details.
- Once Groov has received the
GroovWidgetTokenfrom your app server, Groov widget as part of the webview initialisation will use theGroovWidgetToken(uuidas referred to in the sample code inyour_main.dartsample file) to kick start the journey within your app. These sessions appear as part of your application, making the process feel more seamless and really embedded.- all product interaction within the widget hereafter will be controlled by Groov with direct communication between the Groov widget and the Groov app server.
Any new sessions by the merchant user on your app client will regenerate a new GroovWidgetToken via the handshakes as detailed in steps 2 and 4.
Updated over 1 year ago
What’s Next
Did this page help you?